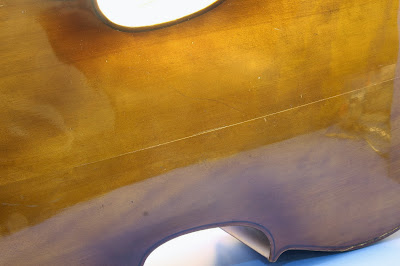
This big guy came in with many problems due to its age:
1. The center seam on both the front and the back plate have opened, shown in the two pictures above and below:
2. There were two open seams on the treble side of the instrument:
3. The nut had come off and was only held in place by the tension of the strings.
4. I also discovered that the fingerboard was coming off when I was about to put everything back together.
5. The endpin was damaged and was not at all parallel to the body of the cello, making playing awkward.
In any case, onto the repairs! (not in order of the problems listed)
1. Glued the nut back on since it was the easiest.
2. The open seams were next. I made new spool clamps for this job; this set of twenty can do both cellos and double basses!
3. The open center seam on the back was next. This particular repair was quite challenging as the two halves of the black plate did not align properly because the treble half had been pushed out by the pressure of the strings (acting through the soundpost)
This stage was rather scary as the wooden boards had quite a bit tension on them. If one of them slipped....
Anyway, I also glued some squares of maple veneer along the interior of the cello along the back center seam to reinforce it:
The spool clamps acted as a weight to keep the veneer squares down:
The front center seam was another problematic issue; the wood in that area apparently shrunk, leaving a gap between the plates, causing them to come apart. The recommended repair procedure was to place wet tissue in the area so that the wood expands but I didn't want to do something so drastic.
I poured as much bone glue as I could into the area to fill it up. However, it was not to be and the seam opened up again a few weeks after I gave the cello back to my friend. If I ever get to see this kind of problem again, I would try putting a thin strips of maple veneer into the gap to fill it. That should prove to be a more lasting repair
5: The endpin hole on this cello was rather big and the endpin that I bought from Synwin was way too small for it. I tried to fatten the new endpin with maple veneer but two of the three pieces I put in fell out off the other side of the hole! The resulting endpin with the strings on was not very straight, but still an improvement over the previous one so I left it at that.
6. The last problem to be discovered and repaired was the fingerboard. It would probably have held on a few more years but since it was obviously opening up, I took the liberty of pouring some glue in:
7: I fitted a new soundpost into the instrument as the old one was a hair too short. The bridge itself was clearly not carved specifically for this cello; the treble side was too high and the bass side was too low. I could have turned the bridge around but then the feet would have fit badly so I just left it be and told my friend to scrounge for another bridge that I can try my hand at carving! The fingerboard also needed shooting as the scoop for the C string was not deep enough but I didn't bother with that as ebony is the hardest wood to carve and I didn't want to mess with it. I also sanded the pegs down as they were a little too big. However, I went a little overboard on that and the pegs are now too slippery!
Anyway, here are pictures of the repaired instrument:
For those of you who don't know what a nut is, its that small rectangular piece of ebony at the end of the fingerboard that contains grooves for the strings to pass through.
Overall, the (semi) repaired instrument sounded quite nice for a low grade cello, with the exception of the A string being a little thin due to the extra wood on the treble side of the bridge. The C string was fine but would buzz if played too loud due to it being way too close to the fingerboard but all in all, I was quite happy with my repair and setup :)


